



Welkom bij Rental Tracker
De onderstaande stappen laten u stap voor stap zien hoe u uw tracker installeert, registreert en activeert. Daarna heeft u direct toegang tot het Rental Tracker-portaal en alle functionaliteiten.
Download the free Rental Tracker app
Download the free Rental Tracker app from the App Store or Google Play.
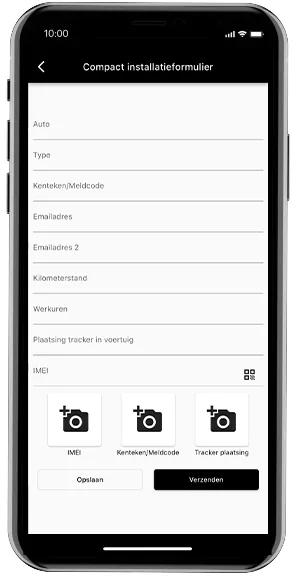
The app gives you access to the dashboard and the digital installation form. This allows you to easily register each tracker during installation. You can find more information about the app at the app page.
Always use the installation form, even when transferring a tracker to another vehicle or piece of equipment. This ensures your records remain up to date and enables us to provide you with prompt support in the event of queries, faults or emergencies.
Installation of the tracker
De Wired Tracker is geschikt voor voertuigen en materieel met een stroomvoorziening van 6–30 V en wordt geleverd met een installatieset.
Professionele inbouw is mogelijk, maar u kunt de tracker ook zelf installeren met behulp van het kleurenschema in de Rental Tracker-app.
De Relay Tracker is eenvoudig zelf te installeren met de meegeleverde kabel op de accu (10–40 V): rood op de pluspool, zwart op de minpool.
Voor de startblokkade sluit u de Relay Tracker met ons Quicklock-systeem rechtstreeks aan op de voertuigbedrading.
Please refer to the Quick Start Guide.
De OBD Connect Tracker is dankzij Plug & Play binnen enkele seconden gebruiksklaar en eenvoudig over te zetten naar een ander voertuig.
Een optionele Y-kabel houdt de OBD-poort vrij voor diagnoseapparatuur. Een eveneens optionele verlengkabel maakt een verborgen installatie mogelijk.
De Stealth Elite Tracker vereist een correcte installatie voor optimaal bereik en een minimale kans op detectie.
Raadpleeg hiervoor de meegeleverde Quickstart Guide.
Bij diefstal of ontvreemding kunt u contact opnemen met onze meldkamer via stealth@rentaltracker.eu
If you don’t have the right expertise, or if you’d prefer to outsource this work, we’d be happy to put you in touch with one of our trusted installation partners.
Register your tracker
Register each tracker using the digital installation form in the Rental Tracker app.
You can choose from:
For quick registration of your own vehicle fleet.
For a complete installation record, including details of the fitter, the customer and any immobiliser.
The confirmation
Once you have submitted the form, you will automatically receive a confirmation email containing all the installation details on file.
Is there a temporary loss of internet connection? If so, the form will be securely saved and automatically sent as soon as the connection is restored.
Activating the tracker
Your tracker is already linked to your account before delivery. As soon as the tracker connects for the first time, it is automatically activated and appears in the Rental Tracker portal. You can find the tracker under the ‘Items’ tab using its unique IMEI number. As soon as the tracker is powered up and starts transmitting data, its status automatically changes to ‘Active’.
Understanding the portal
Log in via the Rental Tracker portal or the Rental Tracker app.
We recommend that you first read this instructional videos to have a look at so you can get off to a flying start!
To use the portal, all you need to do is log in via your browser or the Rental Tracker App. We recommend that you watch these instructional videos first so that you can get off to a flying start. There are instructions on how to change the tracker name, generate reports, change your password, etc.
Heeft u vragen of hulp nodig?
Heeft u verder nog vragen of installeert u de tracker liever niet zelf of? Wij helpen u graag verder of brengen u in contact met één van onze erkende inbouwpartners. Ons supportteam helpt u graag verder en is iedere werkdag bereikbaar van 8.00 tot 20.00 uur.
 Dutch
 English
 German
 Italian
 Spanish
 Danish